Setup and configuration
Set up and configure Pryme Intercompany
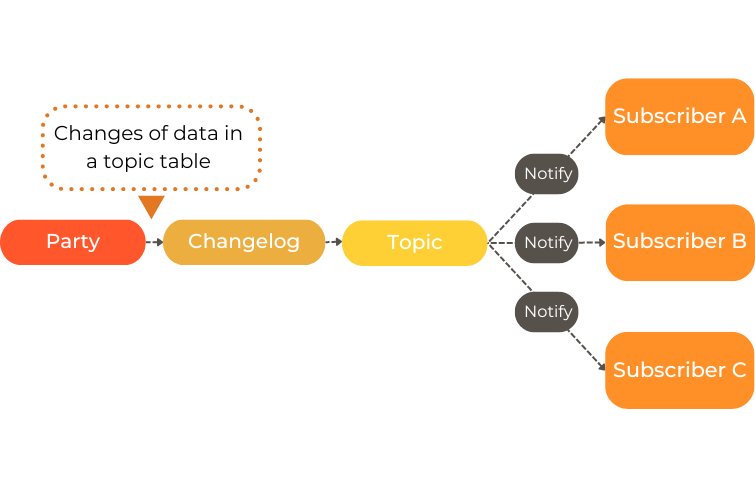
Pryme Intercompany enables seamless data sharing between Business Central companies through Messages. This system is based on three core components: Parties, Topics, and Subscriptions.
- Parties: Business Central companies that exchange data with other companies via Messages.
- Topics: Messages published by one Party and made available for other Parties to subscribe to.
- Subscriptions: Mechanisms that allow a Party to receive data from a Topic.
Configuration Differences
Both apps follow the same process for configuring Parties. However, the setup of Topics and Subscriptions differs.
Pryme Intercompany Master Data App
- Does not include pre-configured templates.
- Data exchanges require manual configuration of Topics and Subscriptions, offering increased flexibility for custom use cases.
Pryme Intercompany Project App
- Includes pre-defined templates for Topics and Subscriptions that are tailored to project-related data (e.g., time entries, expenses).
- Simplifies the setup process and accelerates implementation for project-specific data sharing.
1 - Before you start
Things to do and consider before setting up the Pryme Intercompany app
Before setting up Pryme Intercompany, ensure that the following key considerations are addressed to facilitate smooth implementation and integration.
Party Code
The Party represents Business Central companies that exchange data with other companies through messages.
- All companies must agree on a unique party code. This code identifies each company in the system.
- Use a clear and scalable naming convention, example: Instead of “UK,” use “UK10,” “UK11,” ….
Data Conflicts
Ensure there are no data conflicts before setting up the app. Review and update existing entries to prevent issues.
Key Areas to Check:
- Project numbers
- Resource codes
- Other shared references
Tip
Use the company code as a prefix in the number series for projects to avoid overlap and improve clarity.Master Data
Decide how to manage master data across the group:
- Will one company provide master data for all?
- Or will each company manage its own?
If you choose a central provider, pick one company to share master data with the others.
Key Considerations:
Tables to transfer:
Decide which tables to share. Ensure all related tables required for importing data are included in the master data setup. This will prevent data errors due to missing or incorrect data and save time during setup.
Restrictions or Filters:
Identify and implement any necessary restrictions, filters, or field-level mappings.
Code Harmonization:
Ensure codes are consistent across companies. Align and update the codes if needed.
If Pryme Intercompany for Projects is installed, exclude projects and resources from the master data, as these are managed by the app.
Ensure that related tables required for importing data are included in the master data setup. This will prevent data errors due to missing or incorrect data and save time during setup.
Transfer Time, Expense, and Item Entries
Templates are only available in Pryme Intercompany for Projects
Pryme intercompany project includes two pre-defined templates for transferring ledger entries. The templates can be used individually or together.
Time entries - Time entries and resources.
Project ledger entries - Time, expenses and item ledger entries.
Before you start setting up the Topics and Subscriptions, decide which transactions you want to transfer, and which templates to use.
Time Entries Template
What it does:
- Transfers time entries when timesheet is submitted in the performing company.
- In the “selling company” the project manager can preview, approve and comment the entries until they are posted in the performing company.
- After posting the time sheet in the performing company, project ledger entries are created in both companies.
Limitations:
- Only transfers time entries, not expenses or item entries.
- Entries moved between projects using “Move entries” or entries created in a project journal are not transferred.
- If you re-open a posted time sheet, the changes are not transferred.
Project Ledger Entries Template
What it does:
- Transfers posted project ledger entries for time, expense, and item to the project journal.
- Creates project ledger entries in the selling company.
Limitations:
- Project managers in the selling company can’t preview time entries before posting.
- Is not transferring resources.
Note
If you are only using the Project Ledger Entries template, make sure to add the Resources in a Topic.Combining Templates
To preview time entries (and use the approval flow) and transfer expenses and item entries, use the templates together.
- Time Entries → Time and Resources
- Project Ledger Entries → Expenses and Item Entries
2 - Basic setup
Learn about the basic set up that needs to be done before you start setting up parties, topics and subscriptions in Pryme Intercompany
Pryme Intercompany setup
- Select the 🔎 icon, enter Pryme Intercompany Setup, and choose the related link.
My Party code
Set up the Party code for this company
Disable changelog
If you disable the Changelog, changes of records will not be stored in the change log, and no data can be sent from the company.
Log Modify on all fields
If you enable the an entry will be created in the changelog even though the field that is changed is not part of included fields for that Topic Table.
Email notification
If you prefer to be notified when subscription processing fails, add a email adress in Failure Email Notification Recipients.
Read more about the setup here.
Exclude dimensions
If your company uses local dimensions (dimensions used only within one company), you can exclude them from intercompany messages.
- Select the 🔎 icon, enter Dimensions, and choose the related link.
- For any dimension you want to exclude, select Skip for Intercompany (IDM).
Transferring expenses
Transferring expenses is only available in Pryme Time on PGS
If you are going to transfer project ledger entries for expenses, you must configure do some setup in the companies receiving the expenses:
This prevents expenses from posting to the general ledger during intercompany updates. The G/L posting will happen later when the Purchase Invoice is posted.
Setup expeses
- Select the 🔎 icon, enter Expense Payment Type, and choose the related link.
- Create a new expense payment type for Intercompany puropse. Set the Expense Payment Function to Company Paid and the Expense Posting to NONE.
- Select the 🔎 icon, enter Project Expenses, and choose the related link.
- Create a new Project expense for Intercompany purpose.
- Select the 🔎 icon, enter Project Expense Posting Setup, and choose the related link.
- Set up all combinations of Expense Code and Expense Payment Type.
- Complete the necessary fields. Hover over each field for a short description. Note, you only need to add a Debit account.
Note
The selected g/l account will not be used, because Expense Posting=NONE on the Expense payment type.3 - Step by step
Step by step
Follow a structured approach to configure sending and receiving companies for transferring projects and time entries. The process involves setting up Parties, Topics, and Subscriptions.
Below is a step-by-step guide to help you set up everything in the correct order. After the step-by-step guide you have a detailed description of each step.
Working with intercompany, there is one company sending and one company receiving the data. For two-way data transfer, you must set up the same topic and subscription in both companies.
Before you start setting up the Topics and Subscriptions, you must set up the Parties.
Masterdata
| Company A | Company B |
|---|
| Choose the 🔎 icon, enter Topics (IDM), and select the related link. | |
| Create a Topic. Message processing type=Generic | |
| Add the Tables you want to transfer | |
| Review and update the table definitions. | |
| Set status to Ready | |
| Restart the company. | |
| Choose the 🔎 icon, enter Subscriptions (IDM), and select the related link. |
| Create a Subscription for Masterdata. |
| Review and update the Table definitions. |
Templates
Templates are only available in Pryme Intercompany for Projects
Working with intercompany, there is one company sending and one company receiving the data. In the description below these are called:
- Company A -> Sending projects and receiving resources and time entries
- Company B -> Receiving projects and sending resources and time entries
Projects
| Company A | Company B |
|---|
| Choose the 🔎 icon, enter Topics (IDM), and select the related link. | |
| Create a Topic. Message processing type=Project | |
| Review and update the table definitions. | |
| Set status to Ready. | |
| Restart the company. | |
| Choose the 🔎 icon, enter Subscriptions (IDM), and select the related link. |
| Create a Subscription for Projects. |
| Select the Topic for Time entries. |
| Select if you want to add an Invoice template or/and a Price template on the project. |
| Review and update the Table definitions. |
Time entries
If you want to transfer time entries only, use the Time entries Template. It will transfer Time entries and resources between companies.
When a timesheet is submitted in Company B, the entries are available for the project manager in Company A to preview and approve (for informational purposes only).
| Company A | Company B |
|---|
| Choose the 🔎 icon, enter Topics (IDM), and select the related link. |
| Create a Topic. Message processing type=Time Entries. |
| Review and update the table definitions. |
| Set status to Ready. |
| Restart the company. |
| Choose the 🔎 icon, enter Subscriptions (IDM), and select the related link. | |
| Create a Subscription for Time entries. | |
| Select the Topic for Time entries. | |
| Review and update the Table definitions. | |
Time, expenses and items
If you want to transfer time, expense and items you have two options.
Note, if you want to transfer expenses you must update your setup for expenses. You can read more about it here.
Using this alternative you use two different templates in combination.
- Time -> Time entries template
- Expenses and items -> Project ledger entries template.
| Company A | Company B |
|---|
| Choose the 🔎 icon, enter Topics (IDM), and select the related link. |
| Create a Topic. Message processing type=Time Entries |
| Create a Topic. Message processing type=Project ledger entries |
| Add a condition in the Type field to include only g/l account and item in the data message. |
| Review and update the table definitions. |
| Set status to Ready on both Topics. |
| Restart the company. |
| Choose the 🔎 icon, enter Subscriptions (IDM), and select the related link. | |
| Create a Subscription for Time entries. | |
| Select the Topic for Time entries. | |
| Review and update the Table definitions. | |
| Create a Subscription for Project ledger entries. | |
| Select the Topic for Project ledger entries. | |
| Review and update the Table definitions. | |
| Setup Expense payment type, Project expense code and Project expense posting setup. Read more about it here. | |
Alternative 2 – Without approval flow for time entries
Using this alternative, you use the Project ledger entries template for all transactions.
| Company A | Company B |
|---|
| Choose the 🔎 icon, enter Topics (IDM), and select the related link. |
| Create a Topic. Message processing type=Project ledger entries |
| Add a condition in the Type field to include only g/l account and item in the data message. |
| Review and update the table definitions. |
| Create a Topic. Message processing type=Time Entries |
| Open the Topic tables |
| Delete Time entry (PGS) table (14045726). |
| Set status to Ready on both Topics. |
| Restart the company. |
| Choose the 🔎 icon, enter Subscriptions (IDM), and select the related link. | |
| Create a Subscription for Project ledger entries. | |
| Select the Topic for Project ledger entries. | |
| Review and update the Table definitions. | |
| Create a Subscription for Time entries. | |
| Select the Topic for Time entries. | |
| Review and update the Table definitions. | |
| Setup Expense payment type, Project expense code and Project expense posting setup. Read more about it here. | |
Note
Never use the Project ledger entries template for Time if you are using the Time Entries template to transfer time entries. Then you will get the entries twice.4 - Setup Parties
Learn how to setup a Party, a company in Business Central sharing data with other companies.
A Party is a company in Business Central sharing data with other companies. Each party can send and receive data. All companies involved in data sharing must be set up as a party. Make sure to first setup your own Party code in Pryme Intercompany Setup.
Watch our video how to setup a Party.
Before setting up the parties, ensure a consistent format for Party Codes is chosen. It is recommended to combine a land code with a number for uniqueness and clarity (e.g., UK10, UK11).
Parties
Companies in the same environment
- Choose the 🔎 icon, enter Parties (IDM), and select the related link.
- Code -> The company’s Party code.
- Data Transfer Type -> Select In-Database.
- Company Name -> Select the company. The name is automatically updated.
- Currency code -> If the companies have different local currencies, select the currency code for the Party (company). If they have the same currency, leave the field blank.
Companies in different environments (Azure)
- Choose the 🔎 icon, enter Parties (IDM), and select the related link.
- Code -> The company’s Party code.
- Data Transfer Type -> Select Azure Service Buz.
- Name -> Add the Name of the company.
- Currency code -> If the companies have different local currencies, select the currency code for the company. If they have the same currency, leave the field blank.
Party Groups
A Party Group is a subset of parties that can be used in a topic to restrict which companies are allowed to receive data.
- Choose the 🔎 icon, enter Party Groups (IDM), and then select the related link.
- Fill in the required fields. Hover over a field to read a short description.
- Enter the code of the Parties that should be grouped under the Parties subpage.
5 - Setup Topics
Learn how to set up Topics in Pryme Intercompany, used for publishing data to other Business Central companies.
Topics are used for publishing data to other parties. Topics do not send data directly but act as a notification system that alerts subscribers to pull data.
The topic defines the types of data (tables and fields) that are available to be transferred to other parties. Conditions can be added to filter and control which data should be transferred.
In the Pryme Intercompany for Projects app, you have access to pre-configured templates that do not exist in the Pryme Master Data app. Because of this, the setup process for a Topic looks slightly different between the two apps.
For this reason, we provide separate instructions for masterdata and templates.
Watch our video how to setup a Topic.
Masterdata
When setting up a Topic for masterdata you have to configure it manually. You add the tables you want to share with other companies, and manually change the table definitions.
Topic card
- Choose the 🔎 icon, enter Topics (IDM), and select the related link.
- Click on New and the Topic card is opened.
- Fill in the fields as necessary. Hover over a field to read a short description.
- Some of the most important fields are:
Message processing type
Select Generic.
Subscription type
Use the field to restrict a Topic to a specific Party or to a Group of Parties.
Subscription Code
If the Subscription Type is Party/Group, add the Party or Party group to whom data is published the topic.
Topic Tables
Shows how many tables are included in the Topic. You can click on the link to open the Topic tables. - Click on the Topic tables action.
Topic tables
- Add the tables you want to transfer.
- Fill in the fields as necessary. Hover over a field to read a short description.
- Some of the most important fields are:
Allow On-Demand Publish
Enables users to manually select which records should be sent to the subscribers, provided the conditions are fulfilled. This field is valid only for tables with special on-demand functionality. Now it is only available Projects.
Conditions
Use this field to set filters to restrict if not all the entries should be included in the Topic message.
Included fields
Shows the number of fields in the table, and how many of them are included in the Topic message. By default, all fields are included in the data message. If you want to exclude fields, click on the link in the Include fields column. - Go back to the Topic card and Set status to Ready.
- Restart the company.
Templates
Only available in Pryme Intercompany for Projects
In Pryme Intercompany for Projects you have pre-configured templates that helps you to create the Topic. You have these templates available:
- Project
- Time entries
- Project ledger entries
Topic card
- Choose the 🔎 icon, enter Topics (IDM), and select the related link.
- Click on New and the Topic card is opened.
- Fill in the fields as necessary. Hover over a field to read a short description.
- Some of the most important fields are:
Message processing type
Select which template you want to use: Project, Time entries or Project ledger entries
Subscription type
Use the field to restrict a Topic to a specific Party or to a Group of Parties.
Subscription Code
If the Subscription Type is Party/Group, add the Party or Party group to whom data is published the topic.
Topic Tables
Shows how many tables are included in the Topic. You can click on the link to open the Topic tables. - Open the Topic Tables.
Topic tables
When using the pre-configured templates, the tables and fields are already added and configured, but they are easy to change.
- If you want to add a table, select New and search for the table to add.
- Fill in the fields as necessary. Hover over a field to read a short description.
- Some of the most important fields are:
Allow On-Demand Publish
Enables users to manually select which records should be sent to the subscribers, provided the conditions are fulfilled. This field is valid only for tables with special on-demand functionality. Now it is only available Projects.
Conditions
Use this field to set filters to restrict if not all the entries should be included in the Topic message.
Note that if you are transferring Time with the Time entries template and are setting up the Project ledger entries template for expenses and items, you must add a condition to only include type g/l account and Item.
If you don’t add this condition, you will get duplicate project ledger entries.
Included fields
Shows the number of fields in the table, and how many of them are included in the Topic message.
Click on the link if you want to change the definitions. - Go back to the Topic card and Set status to Ready.
- Restart the company.
Template - Project
| Table | Table Name |
|---|
| 167 | Job |
| 352 | Default dimension |
| 1001 | Job task |
| 1002 | Job task dimension |
| 14045676 | Permissions PM (PGS) |
| 14045713 | Budget Entry (PGS) |
| 14045718 | Milestones (PGS) |
| 14046302 | Project Team members PGS |
| 14046351 | Project attribute PGS |
| 14046352 | Project attribute Value PGS |
| 14046353 | Project Attr. Value mapping PGS |
| 70230251 | IC Time Approval Outb. ICPRYME |
Note!
If the transfer pricing list is in another currency than LCY, you must add the fields Invoice currency code and Time sheet currency code in the Job table definition.Note!
If you don’t want to transfer the Project attributes, you must delete 3 tables;
- Project attribute PGS
- Project attribute Value PGS
- Project Attr. Value mapping PGS.
Template - Time entries
| Table | Table Name |
|---|
| 156 | Resource |
| 352 | Default dimension |
| 14045726 | Time entry (PGS) |
Template - Project ledger entries
| Table | Table Name |
|---|
| 169 | Job ledger entry |
Transfer all entries in a table
The intercompany apps only transfer new and updated entries. To ensure consistency across all subscribing companies, transfer all entries in a table using the Topic Table -> Create Messages function. Key points to remember:
- Use this for Master data tables after setting up the topic to synchronize data across companies.
- This action adds and updates entries but does not delete records in subscribing companies.
- If invalid records exist in subscribing companies, manual cleanup may be required.
Update a topic with new fields
To add a new field to an existing topic, follow these steps:
- Choose the 🔎 icon, enter Topics (IDM), and select the related link.
- Set the Topic to On hold.
- Open the Topic Tables action under Related.
- Click on Included fields. Message Data Content (IDM) will open.
- Go back to the Topic card and Set status to Ready.
- Restart the company.
- Add the field in the Subscription. See Updating a Subscription after changing the Topic.
6 - Setup a Subscription
Learn how to setup Subscriptions, used for receiving data from other Business Central companies.
After setting up the Topic, create a Subscription for each Party that should pull data from the Topic.
Watch our video how to setup a Subscription.
Masterdata
The subscriptions are setup a bit different depending on if the companies are in the same environment or not.
Same environment
- Select the 🔎 icon, enter Subscriptions (IDM), and select the related link.
- Select New to create a new Subscription.
- General fast tab:
Party code – Select the code for the sending company.
Topic – Select the Topic. - Subscription Tables
The tables that are included in the Topic message. - Use Subscription Fields to modify field-level data processing, mapping, and rules.
Multiple environments using Azure Service Bus
- Run the Topic in the sending company.
- Go to the receiving company.
- Select the 🔎 icon, enter Subscriptions (IDM), and select the related link.
- Enter the Party code for the sending company and select the related Topic.
- Run the Subscription.
- Add the tables under Subscription Tables.
- Use Subscription Fields to modify field-level data processing, mapping, and rules.
Subscription tables
When the Subscription header is filled in, the tables from the Topic are automatically populated in the Subscription tables. It’s possible to delete a table you don’t want to import.
Subscription Fields
Subscription fields is the definition of which fields are imported, and it controls how the data is processed.
Note that you can’t add a filed in the Subscription that doesn’t exist in the Topic.
Some of the most important fields are as follows:
| Field | Comment |
|---|
| Target field No./Name | The number and name of the field that should be updated in your company. It’s not always one-to-one with the Source No/Name in the Topic.
The fields are colour coded:
Green – The field is imported, no action needed.
Red – The field is imported, an action is needed (check the comment field).
Black – The field is not imported. |
| Source field No./Name | The number and name of the table in the sending company. |
| Include field | This field is selected if the field is included when running the subscription. This value can be changed. |
| Skip validation | If this field is selected, the data will not be validated. This means that any data can be imported, even if the field has a related table. |
| Mapping type | When importing a table, it’s possible to change a value in a field on an entry using the Mapping functionality. Mapping must be done if the values in the sending and receiving company are not the same. You can map a field four different ways:
Value – One-to-one mapping.
Filter – Conditional updates based on filters.
Fixed – Assigns a fixed value to all imported transactions.
Currency – Manages local currency conversions. Read more about currencies. |
| Has mapping | If you have selected a Mapping type, you must add the Mapping parameters. Click on Yes/No to update the parameters. |
| Value | From value -> To value
Add one or several one-to-one mappings. This is useful if you want to update the project managers to different values. |
| Filter | Conditional updates based on filters. |
| Fixed | Assigns a fixed value on all imported entries. Useful when you map the Bill-to customer to the sending company’s customer number in your company. |
| Currency | No mapping needs to be done. |
| Comment | When changing or mapping a field, add a comment to document the changes. |
Templates
Only available in Pryme Intercompany for Projects
The subscriptions are setup a bit different depending on if the companies are in the same environment or not. The Subscription looks the same and the example below shows the Project template.
Same environment
- Select the 🔎 icon, enter Subscriptions (IDM), and select the related link.
- Select New to create a new Subscription.
- General fast tab
Party code – Select the code for the sending company.
Topic – Select the Topic. - Options fast tab (only visible for the Project template):
Inv. Setup Template – Select if you want to add an invoice template when creating the project.
Res. price Template – Select if you want to add a pricing list when creating the project. - Subscription Tables.
The tables that are included in the Topic message. - Use Subscription Fields to modify field-level data processing, mapping, and rules.
Multiple environment using Azure Service Bus
- Run the Topic in the sending company.
- Go to the receiving company.
- Select the 🔎 icon, enter Subscriptions (IDM), and select the related link.
- Enter the Party code for the sending company and select the related Topic.
- Run the Subscription.
- Options fast tab (only visible for the Project template):
Inv. Setup template – Defines if you want to add an invoice template on intercompany projects.
Res. price template - Defines if you want to add a pricing list on intercompany projects - Add the tables under Subscription Tables.
- Use Subscription Fields to modify field-level data processing, mapping, and rules.
Subscription tables
When the Subscription header is filled in, the tables from the Topic are automatically populated in the Subscription tables. It’s possible to delete a table you don’t want to import.
Subscription Fields
Subscription fields is the definition of which fields are imported, and it controls how the data is processed.
Note that you can’t add a filed in the Subscription that doesn’t exist in the Topic.
Some of the most important fields are as follows:
| Field | Comment |
|---|
| Target field No./Name | The number and name of the field that should be updated in your company. It’s not always one-to-one with the Source No/Name in the Topic.
The fields are colour coded:
Green – The field is imported, no action needed.
Red – The field is imported, an action is needed (check the comment field).
Black – The field is not imported. |
| Source field No./Name | The number and name of the table in the sending company. |
| Include field | This field is selected if the field is included when running the subscription. This value can be changed. |
| Skip validation | If this field is selected, the data will not be validated. This means that any data can be imported, even if the field has a related table. |
| Mapping type | When importing a table, it’s possible to change a value in a field on an entry using the Mapping functionality. Mapping must be done if the values in the sending and receiving company are not the same. You can map a field four different ways:
Value – One-to-one mapping.
Filter – Conditional updates based on filters.
Fixed – Assigns a fixed value to all imported transactions.
Currency – Manages local currency conversions. Read more about currencies. |
| Has mapping | If you have selected a Mapping type, you must add the Mapping parameters. Click on Yes/No to update the parameters. |
| Value | From value -> To value
Add one or several one-to-one mappings. This is useful if you want to update the project managers to different values. |
| Filter | Conditional updates based on filters. |
| Fixed | Assigns a fixed value on all imported entries. Useful when you map the Bill-to customer to the sending company’s customer number in your company. |
| Currency | No mapping needs to be done. |
| Comment | When changing or mapping a field, add a comment to document the changes. |
Note!
If the companies have different LCY, open the Subscription table and add the fields Invoice currency code and Time sheet currency code. Note that the fields must be added in the Topic first.Review and update table definitions
In Pryme Intercompany Project templates there are fields that needs to be mapped project to ensure correct values in the receiving company’s projects.
Project (Table 167 – Job)
| Target Field No | Target Field Name | Mapping Value | Comment |
|---|
| 5 | Bill-to Customer No. | Fixed | Always map to the sending company’s customer number in the receiving company. |
| 20 | Person Responsible | | Verify if it matches the sending company. |
| 23 | Job Posting Group | | Verify if it matches the sending company. |
| 1011 | Invoice Currency Code | Currency | Use Currency if the companies have different local currencies. Read more about currencies. |
| 2000 | Sell-to Customer No. | Fixed | If the customer table is not part of master data, map to the sending company’s customer number. |
| 14045651 | Resource Invoice Type | Value | If there is a fixed price agreement with the end-customer, but the intercompany agreement is not fixed price you should map to T&M. |
| 14045655 | Item Invoice Type | Value | If there is a fixed price agreement with the end-customer, but the intercompany agreement is not fixed price you should map to T&M. |
| 14045656 | Expense Invoice Type | Value | If there is a fixed price agreement with the end-customer, but the intercompany agreement is not fixed price you should map to T&M. |
| 14045674 | Project Manager PGS | | Verify if the resource matches the sending company. |
| 14045753 | Timesheet Currency Code | Currency | Use Currency if the companies have different local currencies. Read more about currencies. |
Job Task (Table 1001 – Job Task)
| Target Field No | Target Field Name | Mapping Value | Comment |
|---|
| 14045764 | Contract Type PGS | Value | If there is a fixed price agreement with the end-customer, but the intercompany agreement is not fixed price you should map to T&M. |
| 14045709 | Project Manager PGS | | Verify if the resource matches the sending company. |
Permissions (Table 14045676 - Permissions PM)
This table is not mandatory. If permission from the sending company is unnecessary, delete the table.
| Target Field No | Target Field Name | Mapping Value | Comment |
|---|
| 1 | No | | Verify if the resource matches the sending company. |
Time (Table 156 – Resource)
| Target Field No | Target Field Name | Mapping Value | Comment |
|---|
| 51 | Gen Prod Posting Grp | | Verify if it matches the sending company. |
| 58 | VAT Prod Posting Grp | | Verify if it matches the sending company. |
Note!
Pryme intercompany project does not include cost price as part of its default setup. Handle cost prices using one of the following approaches:
- Manually input the cost price for external resources in the receiving company.
- Automate using resource group / resource subgroup. Create a dedicated group/subgroup for IC resources and add transfer pricing rates. Map IC resources to the designated group/subgroup.
Job Journal Line (Table 210)
| Target Field No | Target Field Name | Mapping Value | Comment |
|---|
| 1008 | Currency Code | Currency | See Currency Mapping. |
| 14045810 | Expense Payment Type | Value | Map expense payment types for intercompany transactions. |
Test the Setup
After creating the topic and corresponding subscription, test the setup:
- Send one entry from the sending company.
- Run the subscription manually in the receiving company using Run Subscription.
- When successful, configure a Job Queue for automated subscription processing.
For details on job queue setup, see Set Up Job Queues.
Update a Subscription After Changing the Topic
If changes are made to the Topic field definitions, update the subscription manually:
- Select the 🔎 icon, enter Subscriptions (IDM), and select the related link.
- Choose the Update Source Fields action under the Actions action group.
- Open the Subscription Card.
- Select Subscription Fields under Subscription Tables tab.
- Locate the field to add.
- In Source Field No, add the Table No (same as Target Field No).
Update Subscription Fields after changing the target table
If field is added to or removed from target table listed under Subscription Tables, you can update the Subscription Fields manually.
- Select the 🔎 icon, enter Subscriptions (IDM), and select the related link.
- Select the subscription which subscription fields you want to update.
- Choose the Update Subscription Fields action.
- Open the Subscription Card.
- Select Subscription Fields under Subscription Tables tab.
- Field is added to or removed from Subscription Fields based on whether it was added to or removed from related target table.
7 - Currencies
Learn how to setup currencies when the parties have different LCY
If the parties have different local currencies (LCY) it’s important to have the correct settings in the Party, Topic and Subscription.
Party
Add the currency code that the party have in the General ledger setup.
Topic
Add the fields Invoice currency code and Timesheet currency code in the Job table.
Subscription
- Open the Subscription for Project.
- Open the the Job table.
- Add the fields Invoice currency code and Timesheet currency code in the Job table.
- Set the Mapping type = Currency on the fields you just added.
- Open the Subscription for Project ledger entries.
- Open the Job ledger entry table.
- Set the Mapping type = Currency on the field Currency code.
This is how it works
- If the currency code in the Subscription message is blank, the currency code from the Party code will be used.
- If the currency code in the Subscription message matches the currency code on the Party code, the currency field will be set to blank.
8 - Run topics and subscriptions
Learn how to run topics and subscriptions, or setup job queues to run them automatically.
Once the topics and subscriptions are set up, data transfer can be done manually or automatically using a Job queue. In a Sandbox environment, it is recommended to run topics and subscriptions manually, as you don’t have to wait for the Job queue to execute the run.
Run Topics
The schedule run on changelog value in the topic determines whether it should be run. If set to FALSE, the Topic must be started manually using Action -> Run Topic or scheduled through a job queue.
- Choose the 🔎 icon, enter Topics, and select the related link.
- Go to Actions –> Create Job Queue Entry.
- Fill in the fields as necessary. Hover over a field to read a short description.
- Set Status to Ready.
Run Subscriptions
Manually
- Choose the 🔎 icon, enter Subscriptions (IDM), and select the related link.
- Choose the Subscription to run and select Run Subscription with UI under the Home action group.
- If a prompt appears about updating values, always choose the selected answer.
In Background
- Choose the 🔎 icon, enter Subscriptions (IDM), and select the related link.
- Choose the Subscription to run and select Run Subscription in Background under the Home action group.
- When running in background, there will be no prompts or messages, but also no message about errors in processing. The unprocessed messages must be manually checked.
Via Job Queue
- Choose the 🔎 icon, enter Subscriptions (IDM), and select the related link.
- Go to Actions –> Create Job Queue Entry.
- Fill in the fields as necessary. Hover over a field to read a short description.
Schedule jobs to run automatically.
Note!
If a job queue is created in a sandbox, it will automatically be set to On hold after each run.9 - Set up Azure Service Bus
Learn how to setup an Azure Service Bus connection for intercompany data transfer between Business Central companies in different environments.
When using multiple Business Central environments, you can use Azure Service Bus to transfer data between the companies. Azure Service Bus is a cloud-based messaging service that enables you to send messages between applications and services. Azure Service Bus supports a set of cloud-based, message-oriented middleware technologies including reliable message queuing and durable publish/subscribe messaging. For more information, see Azure Service Bus.
Before configuring the connection to Azure Service Bus in Business Central, a namespace must be created in Azure Service Bus. The namespace is the container for all messaging components in Azure Service Bus. The namespace is created in the Azure portal.
To create a namespace in Azure Service Bus
- Register an application for API connection: Register an application (MS Learn)
- Save the Application (client) ID for later
- Create a Client Secret and save the secret value for later.
- Create service bus namespace, see Create a namespace (MS Docs). It must be Standard tier or better.
- Save the Name of the namespace for later
- Save the Subscription Id where the Namespace was created for later
- Under Access control (IAM), add the registered application from step 1 as Role, Azure Service Bus Data Owner: Authenticate and authorize an application (MS learn)
After completion you will have the following values to insert into Business Central:
- Directory (tenant) ID from Azure AD
- Application (client) ID from the created App Registration.
- Client Secret from the created App Registration.
- Subscription Id where the ASB Namespace was created
- Azure Service Bus Namespace name from the created Azure Service Bus Namespace
Note
It is important to clearly separate the test and production environments. The test and production environments must never use the same Azure Service Bus namespace.
The test environment must be set up with a separate Azure Service Bus namespace, and the production environment must be set up with a separate Azure Service Bus namespace. If multiple test environments are used, each test environment must be set up with a separate Azure Service Bus namespace.To set up Azure Service Bus in Business Central
- Choose the 🔎 icon, enter Azure Service Bus (IDM), and then select the related link.
- Fill in the fields as necessary. Hover over a field to read a short description.
Tip
When an environment is copied to a sandbox, the Azure Service Bus connection is automatically disabled in the sandbox. If you want to use enable it, remember to set up and select a namespace dedicated to that sandbox.To set parties to use Azure Service Bus
- Choose the 🔎 icon, enter Parties (IDM), and then select the related link.
- Select the party to set up for Azure Service Bus.
- Select Azure Service Bus in the Data Transfer Type field.
10 - Subscriptions email notifications
Learn about the email notifications for the subscriptions.
When a subscription processing fails email notification can be sent to inform the certain persons about it.
To set up email notifications
You must set up email as described in Set up email.
There is email scenario Subscription Notification to which you can assign specific email account if you prefer to send email notifications through it.
Email notifications settings
On the Pryme Intercompany Setup page, under the Email Notifications FastTab, In the field Failure Email Notification Recipients, you can specify who you want to receive email notifications when there is subscription which processing failed.
Tip
If you want to define multiple email addresses for receiving email notifications, you can do so by using a semicolon (;).On the Pryme Intercompany Setup page use the Schedule Email Notifications action if you want automatically to create a job queue entry for sending email notifications for subscriptions.
Sending email notifications
Email notifications when there is subscription which processing failed are sent via job queue entry which you can schedule as described in Email notifications settings.